This isn’t exactly a woodworking project although it did require a bit of cabinet re-purposing. If you’re looking to glean some woodworking wisdom, you may want to move on. But if you’re dealing with a clothes dryer that doesn’t dry very well, you may find this information helpful.
We noticed that over time, it was taking longer and longer to dry clothes with our fancy-schmancy LG clothes dryer. Eventually, we had to clean out the lint that collected in the dryer hose and the 4″ duct running from the laundry room to the outside of the house. This was not a fun job: it involved moving the dryer out of the way, detaching the hose, and then cleaning/vacuuming out the hose and metal duct. Due to the excessive length of the duct (about 20 feet!), the exhaust fan in the dryer is not able to push the lint all the way through the duct to the outside. The lint ends up collecting in the hose and duct especially in the elbow in the ceiling where the hose connects to the duct.
Once the lint was removed, the dryer functioned well. But, the lint clogging kept coming back – sort of like uncle Lenny. After going through the lengthy cleaning process a couple times, I decided to do a little research and see what solutions might be out there (short of relocating the dryer to an external wall). That’s when I discovered this wonderful device called a dryer booster fan. It pretty much does what the name implies: it’s an auxiliary fan that mounts in the ducting system in order to boost the flow of moist warm air from the dryer to the outside. Dryer booster fans are typically used in apartment buildings where long duct runs are not uncommon.
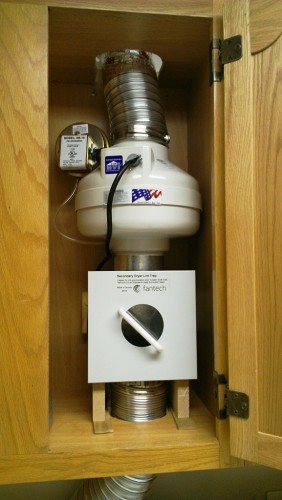
I purchased the Fantech DBF 110 Dryer Booster Fan. It sells for about $200 on Amazon but I picked up a returned unit on Amazon for $140. This particular model turns on and off by sensing airflow through the duct and cycles the fan at 10 minute intervals until the dryer has stopped. It is recommended that the fan be installed at least 15 feet from the dryer outlet but not less than 5 feet. If it’s less than 15 feet, a lint trap should be used to minimize the amount of lint passing through the fan. I opted to mount the fan plus lint trap in an existing cabinet 5 feet from the outlet versus cutting out a section of the ceiling and mounting the fan overhead.
The project required detaching the cabinet from the wall and cutting holes in the top and bottom of the cabinet with a jig saw to accommodate the dryer hose. The cabinet was then reattached to the wall. The next step was to create a wooden platform to mount the lint trap securely in place at the bottom of the cabinet. This consisted of a 3/4″ plywood back attached to two 4″ high side pieces. The metal frame of the lint trap sat on top of the side pieces and was screwed to the plywood back via two screws that were long enough to also secure the plywood to a piece of 2 x 4. The 2 x 4 was glued to the cabinet back and one side was screwed into the wall stud.
The fan assembly was then mounted directly on top of the lint trap by sliding the plastic flange on the bottom of the fan into the metal ducting on top of the lint trap. This formed a nice airtight seal. A 10″ piece of aluminum dryer hose was attached to the top of the fan and secured with a hose clamp. The top of the hose connected to a metal elbow recessed into the laundry room ceiling which then connected to the metal duct running to the outside of the house. Note that the hose hole in the top of the cabinet was cut a bit oversize. This was done as a safety measure to prevent excessive heat buildup in the cabinet.
At the time of this writing, several loads of laundry have gone through the dryer and the good news is that drying times have been cut almost in half thanks to the dryer booster fan. I’m hopeful that the lint trap will capture most of the duct-clogging lint and keep the dryer running efficiently. It’s a little extra work to clean the lint trap every few loads but much easier than cleaning out the whole duct system. I’m also hoping the electricity bill will go down…


